Home › Start here › System › Settings ›
Settings
This article teaches how to set the general settings of the system, such as a cover photo, logo, color, domain, contact information, etc.
-
the correct administrator permission (“instance”)
-
prepared the cover photo, logo, domain address, color type, contact information.
-
Log in as an administrator with the permission “instance” (included with the Role “Superuser”).
-
From the main menu, go to System > Settings.
-
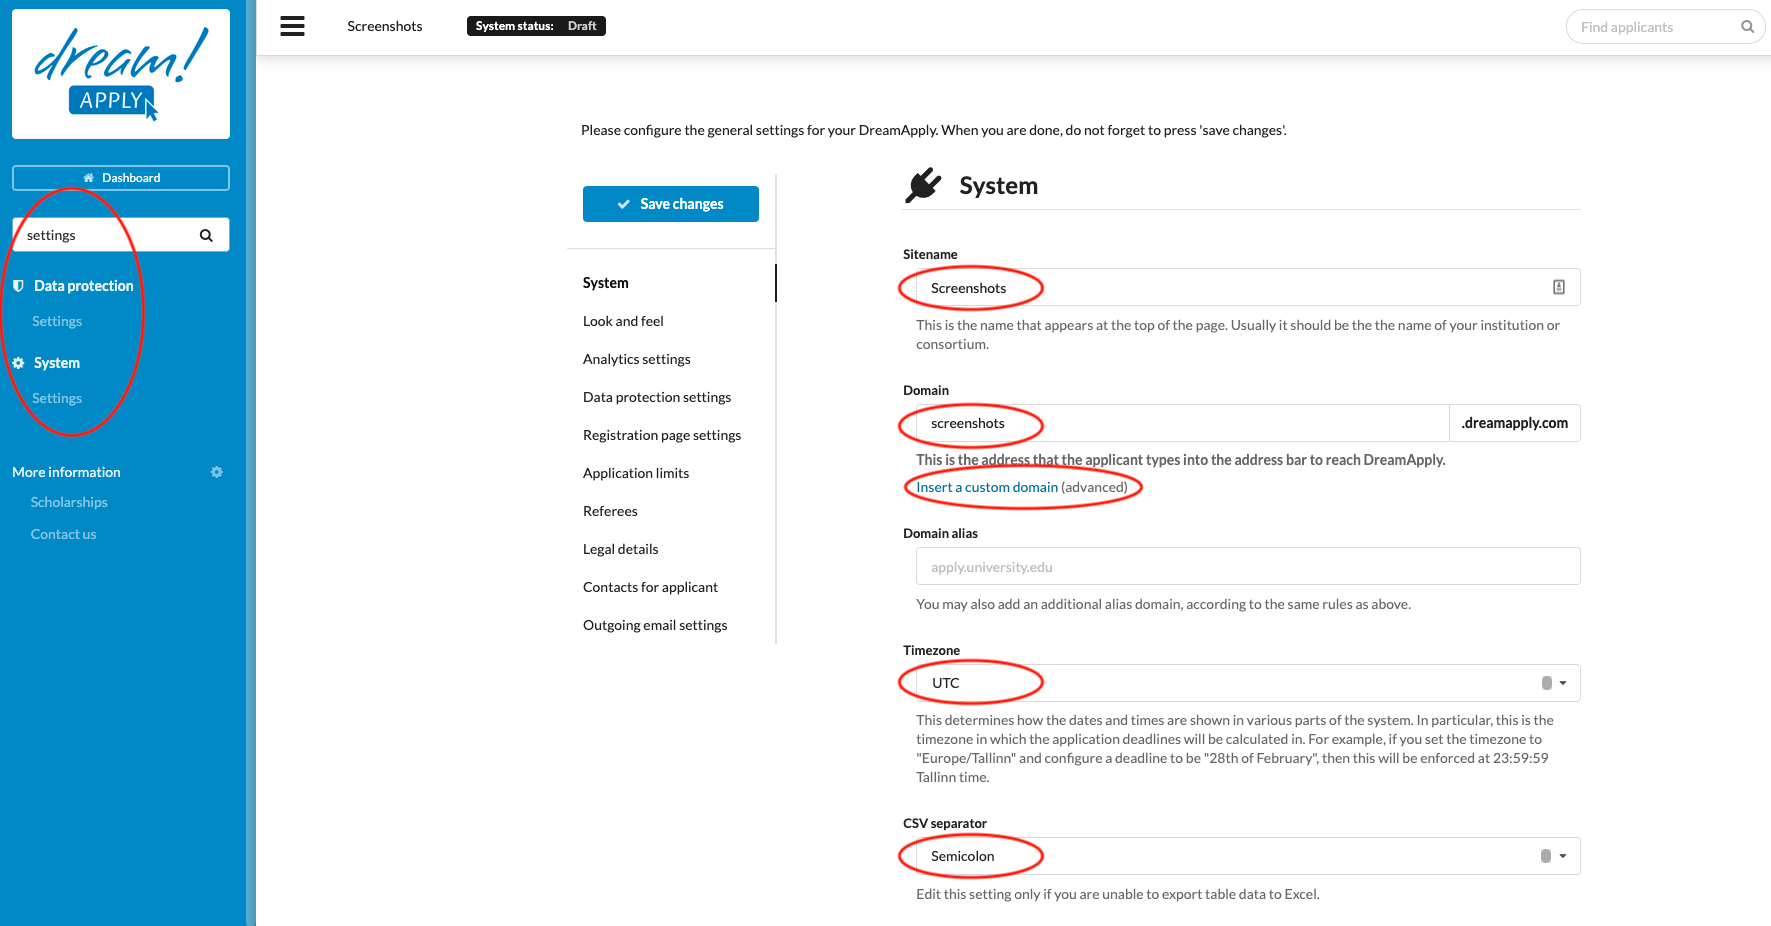
Enter a Sitename - This is the name that appears at the top of the page. Usually, it should be the name of your institution or consortium.
-
Enter a domain - This is the address that the applicant types into the address bar to reach DreamApply.
- (optional) Custom domain – it is possible to use any domain or subdomain for your DreamApply site. You might need to contact your system administrators to get this feature to work.
-
-
(optional) Enter a Domain alias - You may also add an alias domain to create an additional domain from which to access your DreamApply system. You might need to contact your system administrators to get this feature to work.
-
Set the time zone of the system.
-
Select a CSV separator- Choose between Comma and Semicolon options.
-
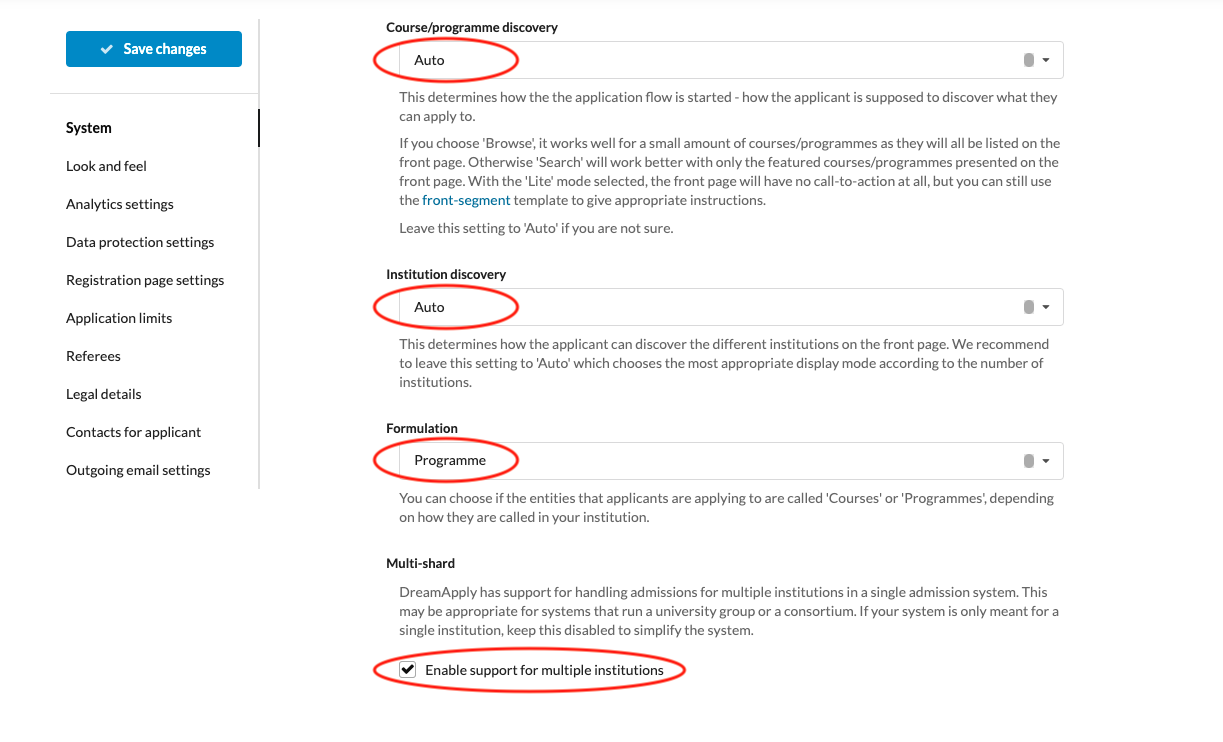
Select an Aspects - This determines how the front-page will display. Choose between:
-
Auto – the system will display what it believes would be the best option.
-
Browse - the visitor will be redirected to the search tab. If you choose “search,” then “search” fields will appear directly on the landing page.
-
-
Formulation - You can choose to have your system refer to what applicants are applying to as “Courses” or “Programmes”.
-
Multiple institution - This will change the system from one for use by a single institution to one that is for use by multiple institutions.
-
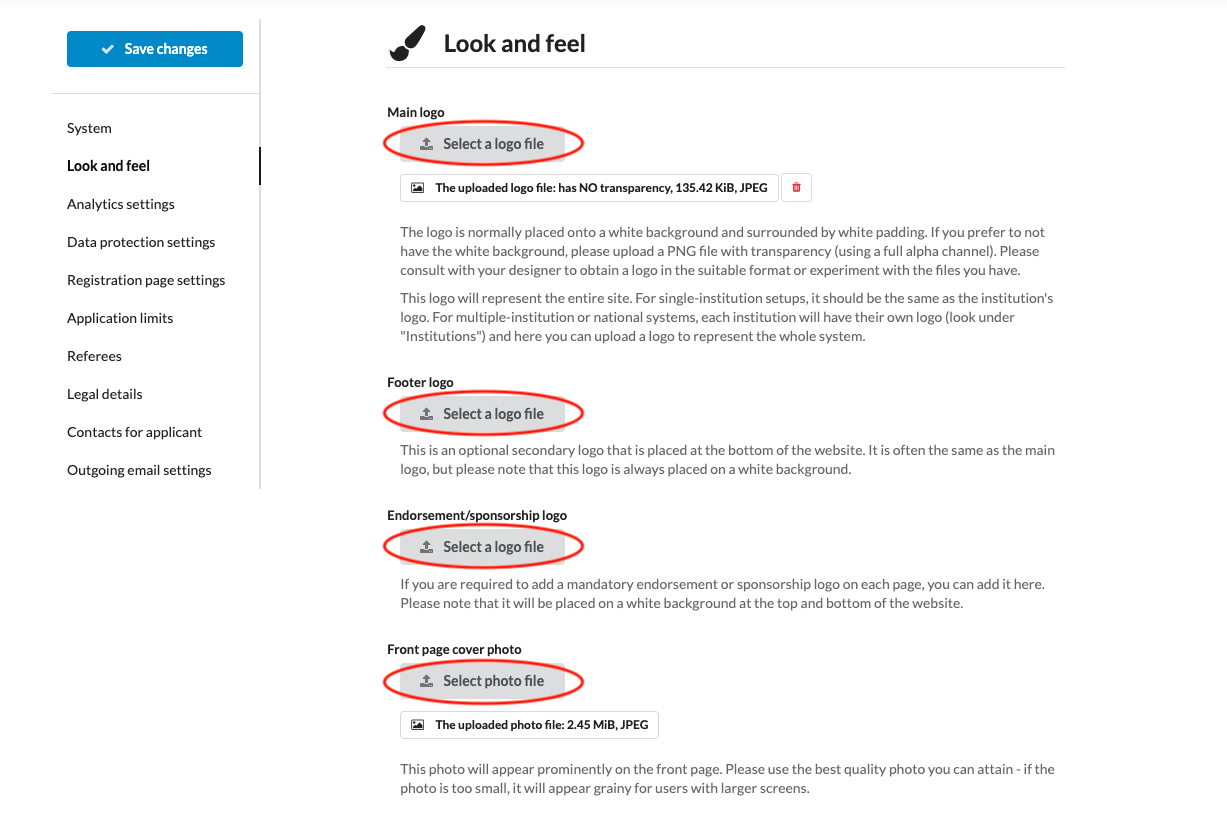
Upload various images:
-
Main logo – This is where it is possible to upload the logo for the entire system. This will be the logo that will be visible at the top left corner of every page in your DreamApply system.
-
Footer logo – This is where it is possible to upload a secondary logo that will appear at the bottom of every page in your DreamApply system.
-
Endorsement/sponsorship logo – This is where it is possible to upload a required image can be added so that the proper attribution can be shown on the top and the bottom of every page of the system.
-
Front page cover photo – This is where the cover photo for landing page can be uploaded.
-
-
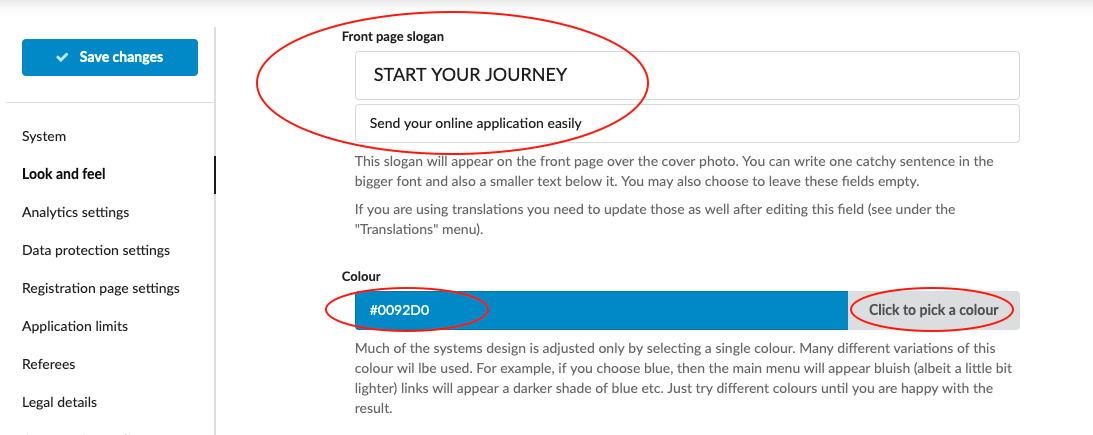
Enter the main and secondary Front-page slogans for the landing page.
-
Set the system Colour – This is where to set the system colour which will be used for the Main menu and most buttons within the system.
-
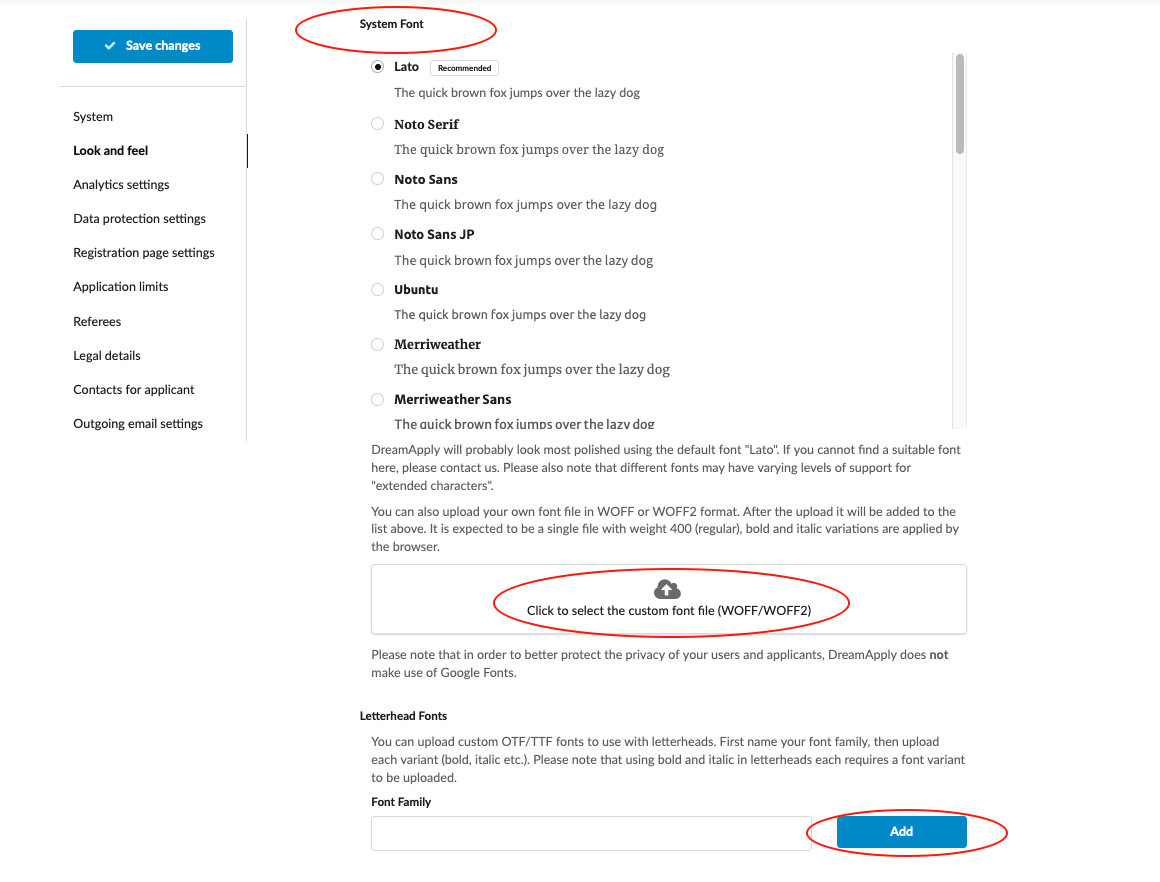
Font - Choose a suitable font for your system. It will affect on all the content in the system, including admin menu, landing page, course description, application, applicant view and etc.
-
Upload your own font - You can also upload your own font file in WOFF or WOFF2 format. After the upload it will be added to the font’s list. It is expected to be a single file with weight 400 (regular), bold and italic variations are applied by the browser.
-
Letterhead fonts - You can separately upload custom OTF/TTF fonts to use with letterheads. First name your font family, then upload each variant (bold, italic etc.). Please note that using bold and italic in letterheads each requires a font variant to be uploaded. Uploaded font will apply only for letterheads.
-
-
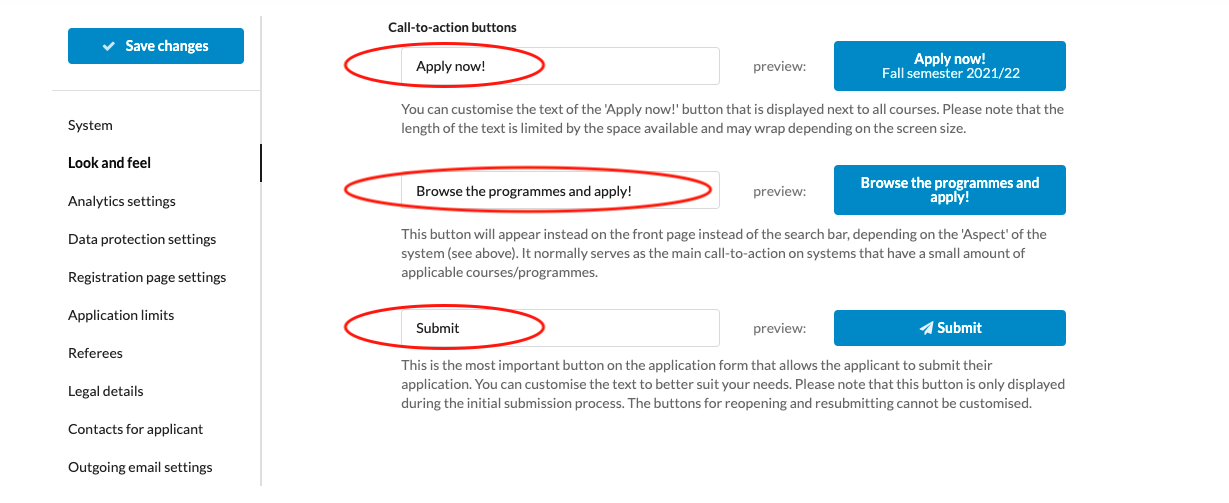
(optional) Edit the Call-to-action buttons - This is where the text for the main five call-to-action buttons can be edited.
-
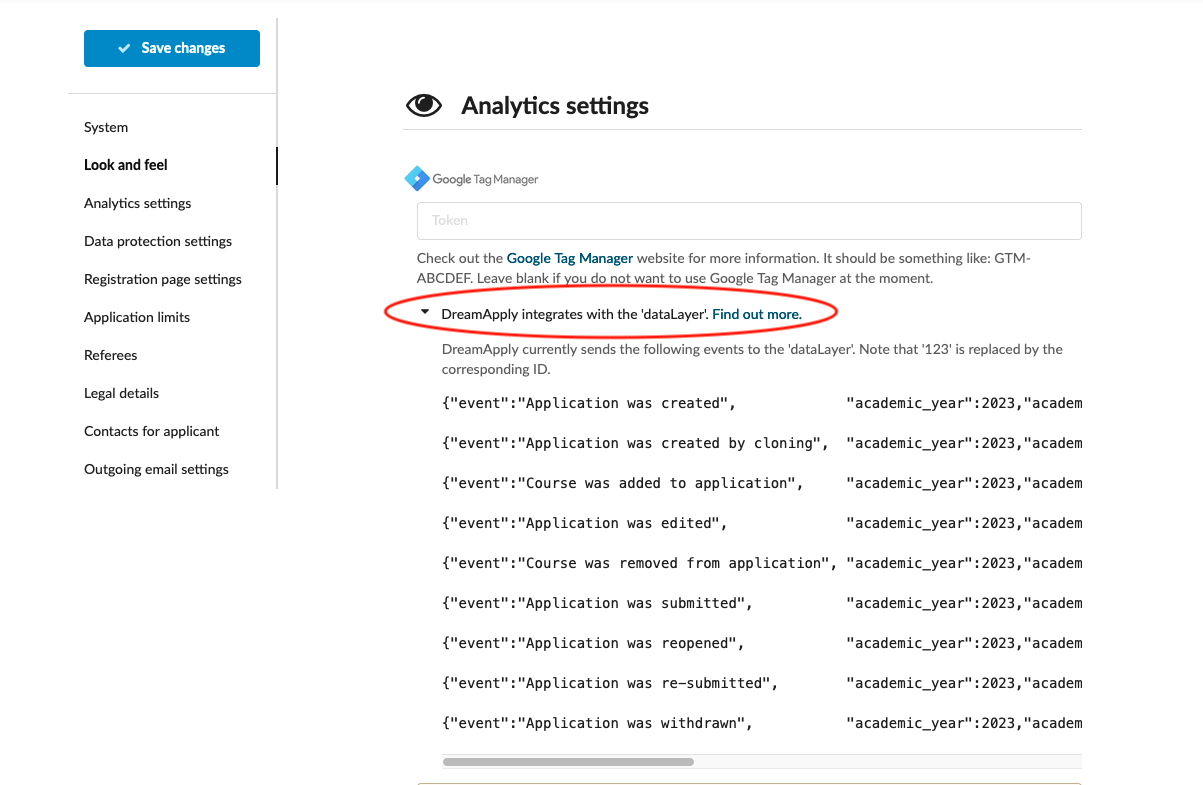
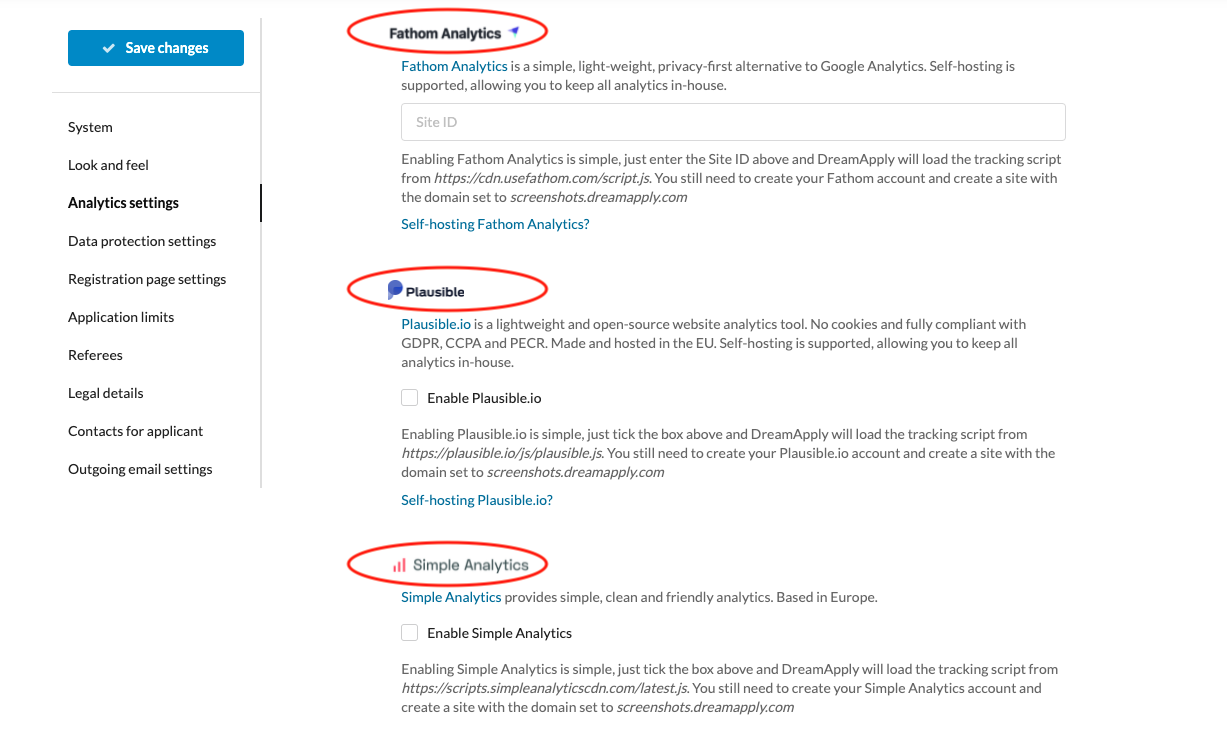
(optional) Add your unique codes in the following fields, if you would like to synchronize your google tag manager, google analytics, Motono analytics, and/or Fathom analytics accounts with DreamApply. In case of Plausible and Simple Analytics just tick the box under those names and they will automatically connect to DreamApply.
-
In case of Google Analytics and Tag manager DreamApply integrates with DataLayer and sends the events to it.
-
Fathom analytics and Plausible offers the self-hosting service. To activate the self-hosting service, click on “Self-hosting” button and populate the field with a relevant data provided by Fathom Analytics and/or Plausible.
-
-
Data protection settings:
-
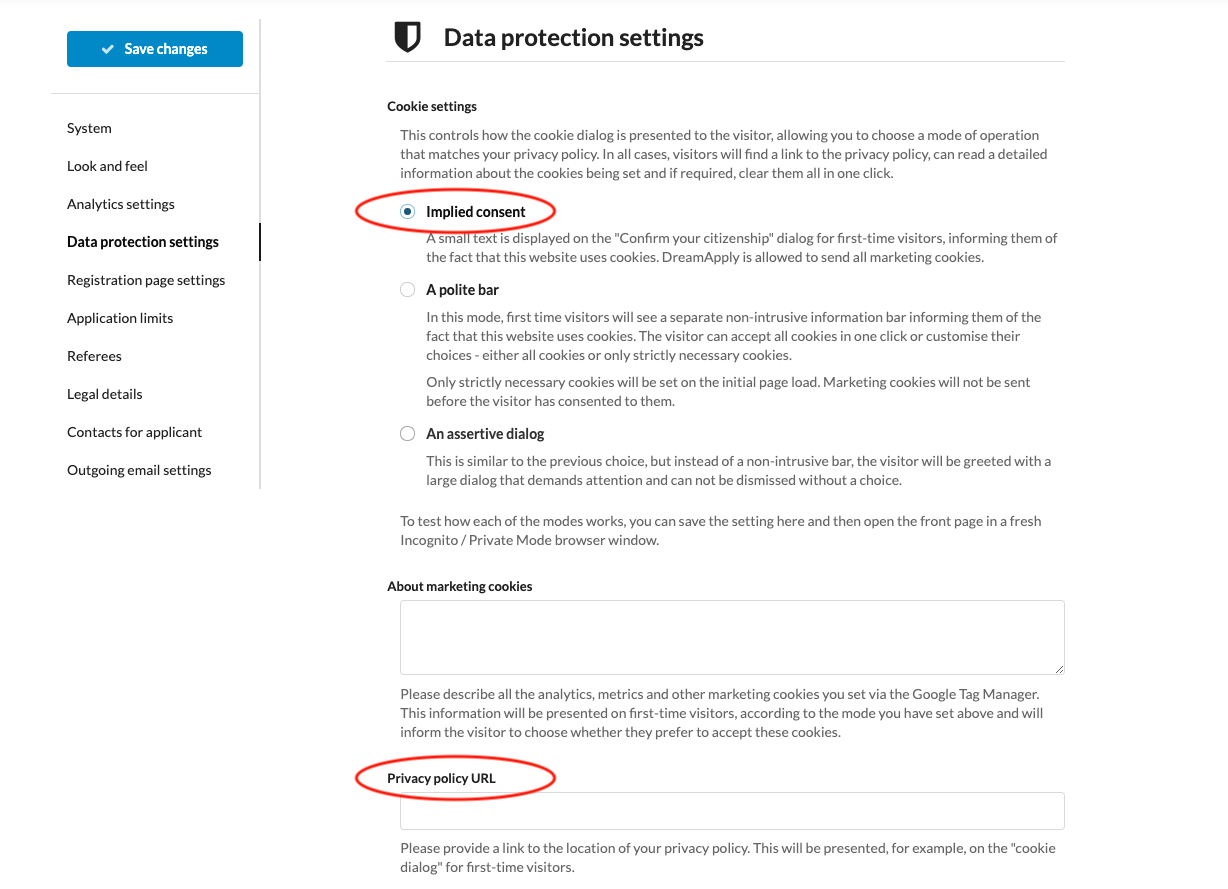
Cookie settings - This controls how the cookie dialog is presented to the visitor, allowing you to choose a mode of operation that matches your privacy policy. In all cases, visitors will find a link to the privacy policy, can read a detailed information about the cookies being set and if required, clear them all in one click:
-
Implied consent - A small text is displayed on the “Confirm your citizenship” dialog for first-time visitor, ifnroming them of the fact that this site uses cookies. DreamApply is allowed to send all marketing cookies.
-
A polite bar - In this mode, firts time visitor will see a separate non-intrusive information bar informing them of the fact that this site uses cookies. The visitor can accept all cookies in one click or ustomise their choices - either all cookies or only strictly necessary cookies.
-
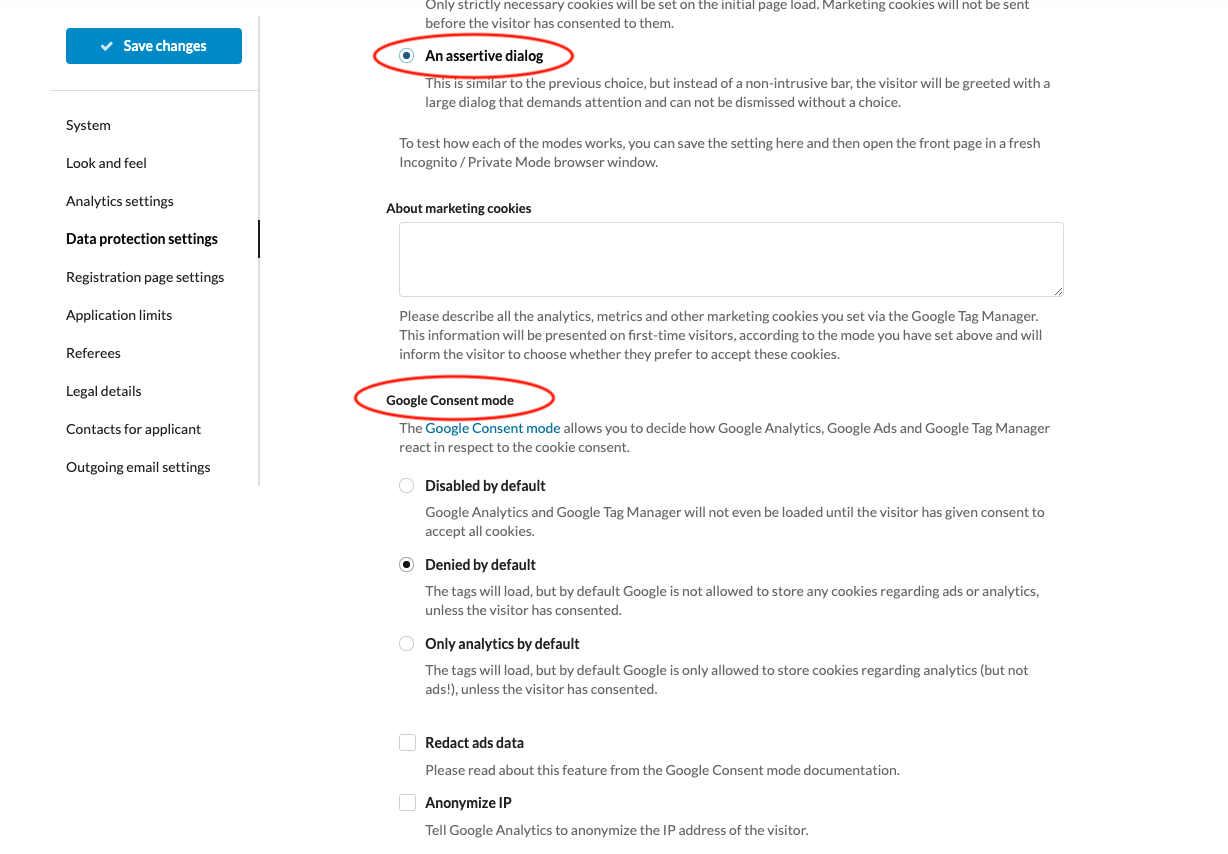
An assertive dialog - This is similar to previous choice, but instead of a non-intrusive bar, the visitor will be greeted with a large dialog that demands the attention and can not be dismissed without a choice.
-
-
Google consent mode: In case of choosing “A polite bar” or “An assertive dialog” you have to set the google consent mode.
-
Disable by default - Without visitor’s consent, Google analytics and tag manager will not be loaded
-
Denied by default - Unlikely the first option, in this case google tag manager will be loaded automatically but it won’t store any cookies without visitor’s confirmation.
-
Only analytics by default - This option is the most aggressive. It will load tags by default, but Google automatically will store analytics related cookies. For add cookies it will require the consent from the visitor.
-
Tick the box to redact ads data
-
Tick the box to to anonymize visitor’s IP address for Google Analytics
-
-
-
Provide the additional description about your marketing cookies
-
Add the privacy policy URL. This will be presented, for example, on the “cookie dialog” for first-time visitors.
-
-
Read more about Cookie settings
-
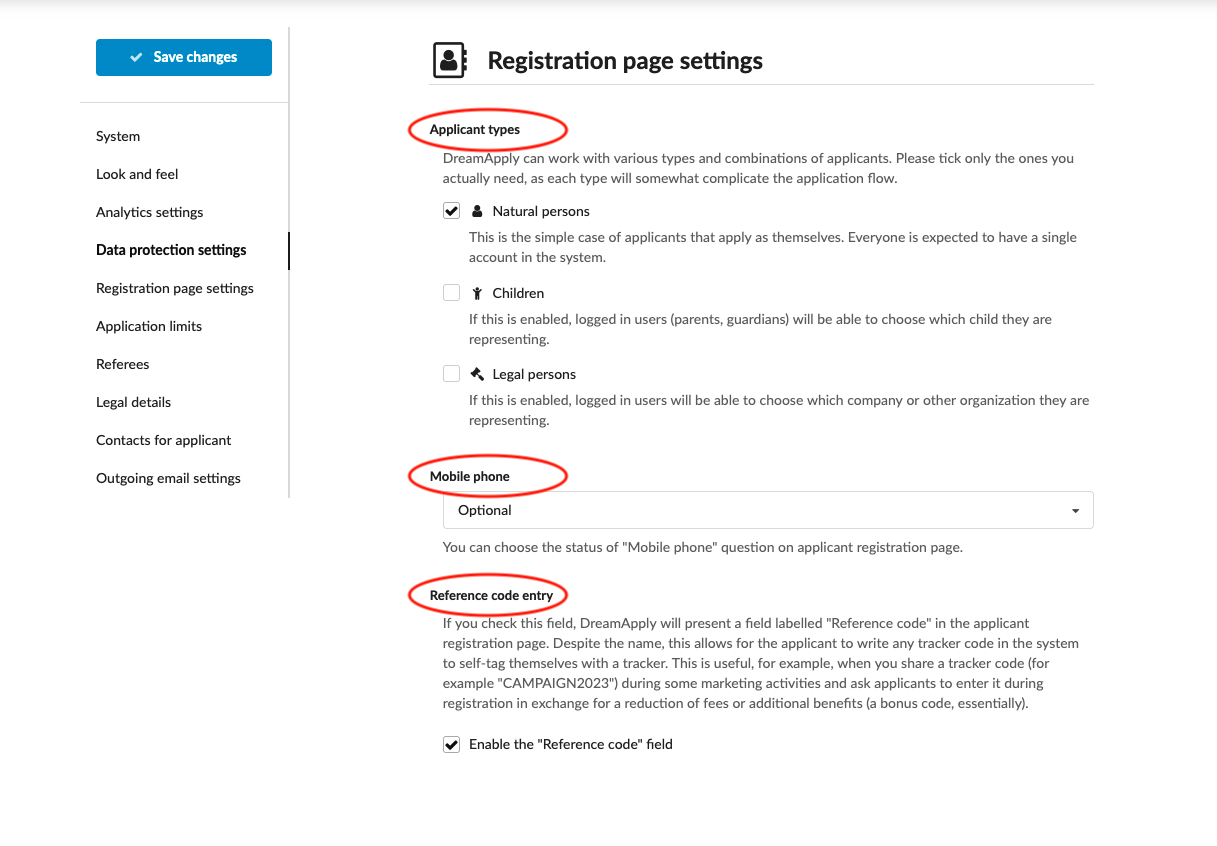
Applicant types - DreamApply can used used for enrolling Higher education applicants, high / secondary school applicants, summer school applicants and etc. For this reason, you have to specify the type of your applicants. You must choose the only type from the following options:
-
Natural persons- If system is going to be used by higher education institutions, then tick this option.
-
Children - If system is going to be used by High / secondary school, then choose this option. It will allow parents to register in the system and represent the child.
-
Legal persons - If this option is enabled, then login user will be able to choose which company or organization they are representing.
-
-
Select Registration page settings:
-
You can set “Skype name” and “Mobile phone” number as either hidden, optional or mandatory fields in the registration form.
-
To activate the reference code field for applicants during the registration stage, simply check the box. This feature proves valuable when you need to share reference codes with applicants, allowing them to include these codes in their applications. If you have no intention of using the reference code field, you can easily deactivate it by unchecking the box.
-
-
Select Application limits:
-
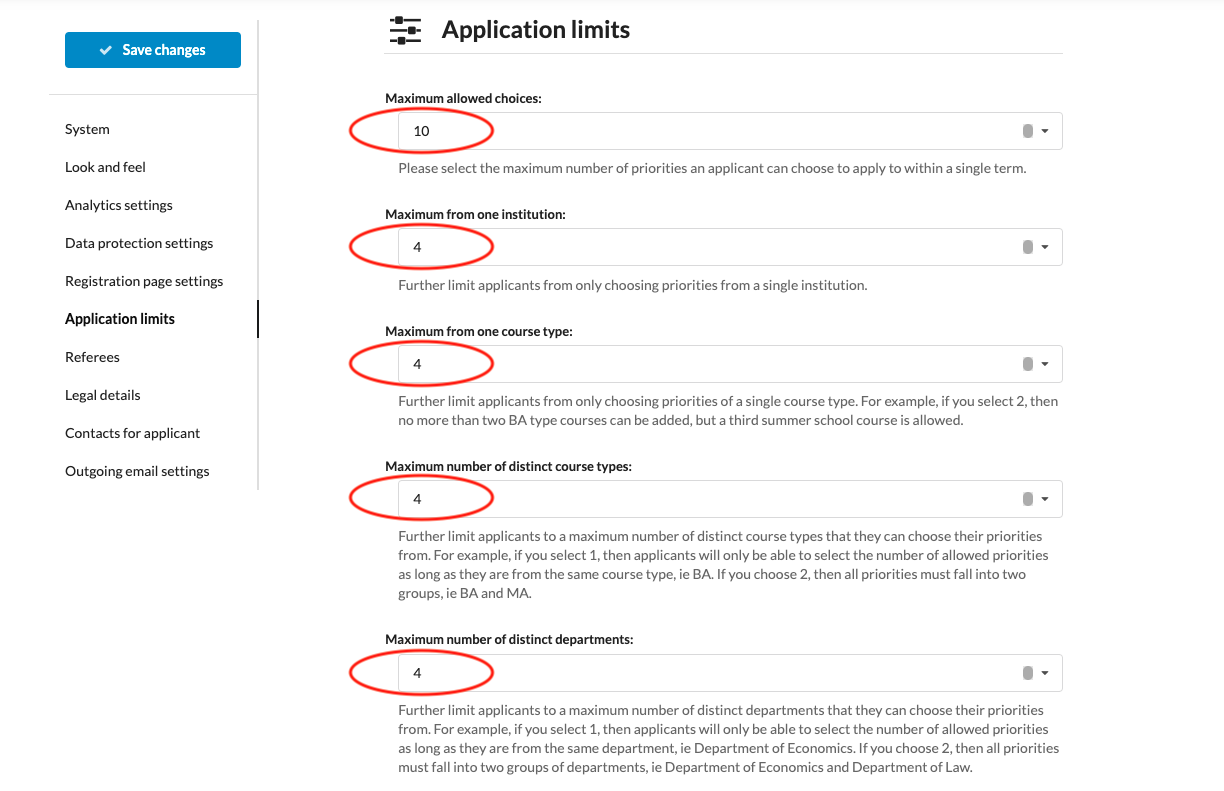
Maximum allowed choices – This is where you can select the number of priorities an applicant can choose to apply to with one application.
-
Maximum from one institution – This setting further limits the number of priorities applicants can apply to from a single institution (only available for Multiple institution systems).
-
Maximum from one-course type – This setting further limits the number of courses of the same course type and applicant can apply to with a single application. For example, if you select 2, then no more than two BA type courses can be added, but a third summer school course is allowed (if the Maximum allowed choices is greater or equal to 3).
-
Maximum number of distinct course types - This setting further limits applicants to a maximum number of distinct course types applicants can choose their priorities from. For example, if you select 1, then applicants will only be able to select the number of allowed priorities if they are from the same course type, ie, BA. If you choose 2, then all priorities must belong to 2 offer types, ie, BA and MA.
-
Maximum number of distinct departments - This setting further limits applicants to a maximum number of courses that belong to distinct departments. For example, if you select 1, then applicants will only be able to select the number of allowed priorities as long as they are from the same department, ie, Department of Economics. If you choose 2, then all priorities must fall into two departments: ie, Department of Economics and Department of Law.
-
-
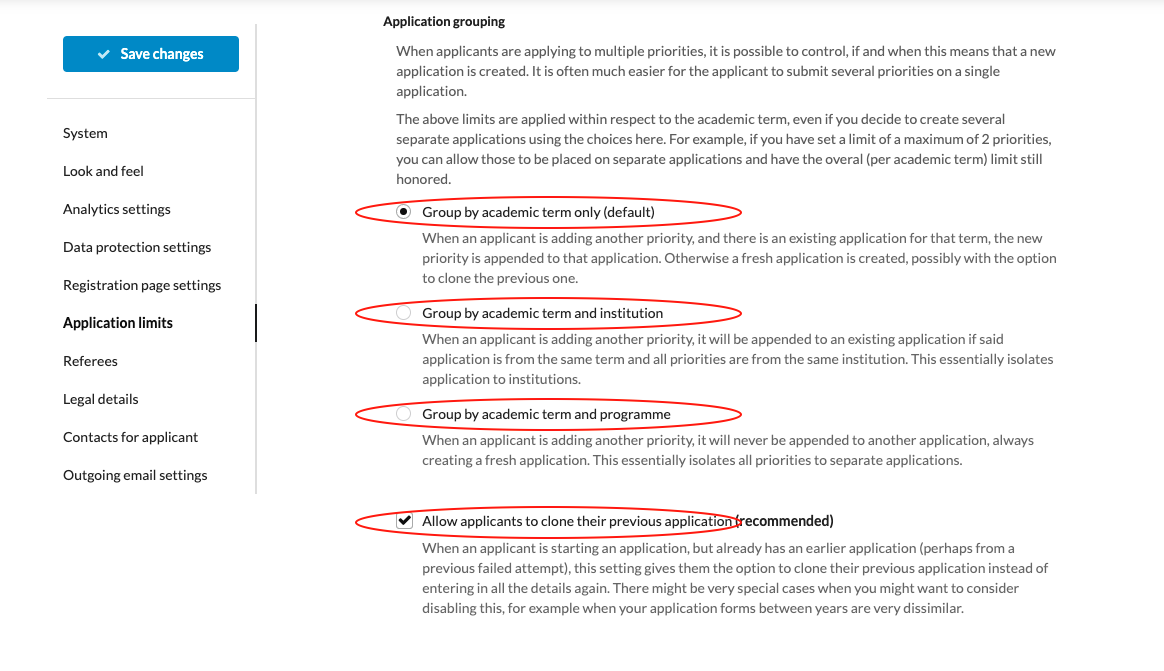
Application grouping - When applicants are applying to multiple priorities, it is possible to control, if and when this means that a new application is created. It is often much easier for the applicant to submit several priorities on a single application. The above described limits are applied within respect to the academic term, even if you decide to create several separate applications using the choices here. For example, if you have set a limit of a maximum of 2 priorities, you can allow those to be placed on separate applications and have the overal (per academic term) limit still honored.
-
Group by academic terms only - When an applicant is adding another priority, and there is an existing application for that term, the new priority is appended to that application. Otherwise a fresh application is created, possibly with the option to clone the previous one.
-
Group by academic term and institution - When an applicant is adding another priority, it will be appended to an existing application if said application is from the same term and all priorities are from the same institution. This essentially isolates application to institutions.
-
Group by academic term and programme - When an applicant is adding another priority, it will never be appended to another application, always creating a fresh application. This essentially isolates all priorities to separate applications.
-
-
Allow applicants to clone their previous application - If applicant had an application in the system for a previous year /intake and starts the new application for the new academic year / intake, then as a default (keep this option ticked) system allows to clone the previos application, adjust and apply for new academic year. If this option is not ticked, then applicant would not be able to clone the previous application and has to fill in the fresh application to apply for a new academic year.
-
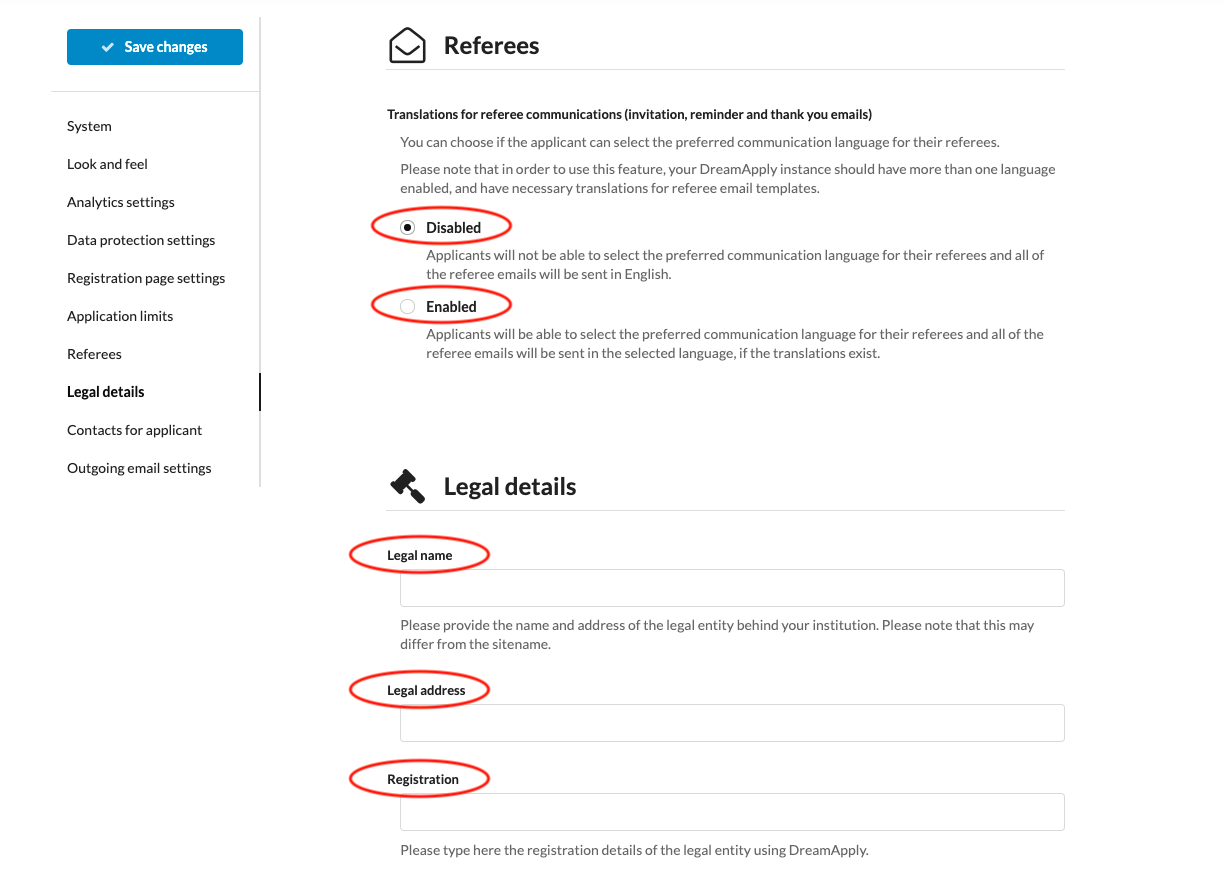
Referees - If your platform has more than one language, then you can allow applicant to choose the communication language between referee and the system. By ticking “Enable”, applicant will be able to choose the preferable language for communication. Remember, that all of the referee emails will be sent in the selected language. By ticking “Disable”, system use the default language (English) for the communication with the referee and all referee emails will be sent in English.
-
(optional) Enter Legal details - For better customization, it is possible to add legal name, address, and registration details of the legal entity using the DreamApply system. This information is not publicly visible anywhere in the system.
-
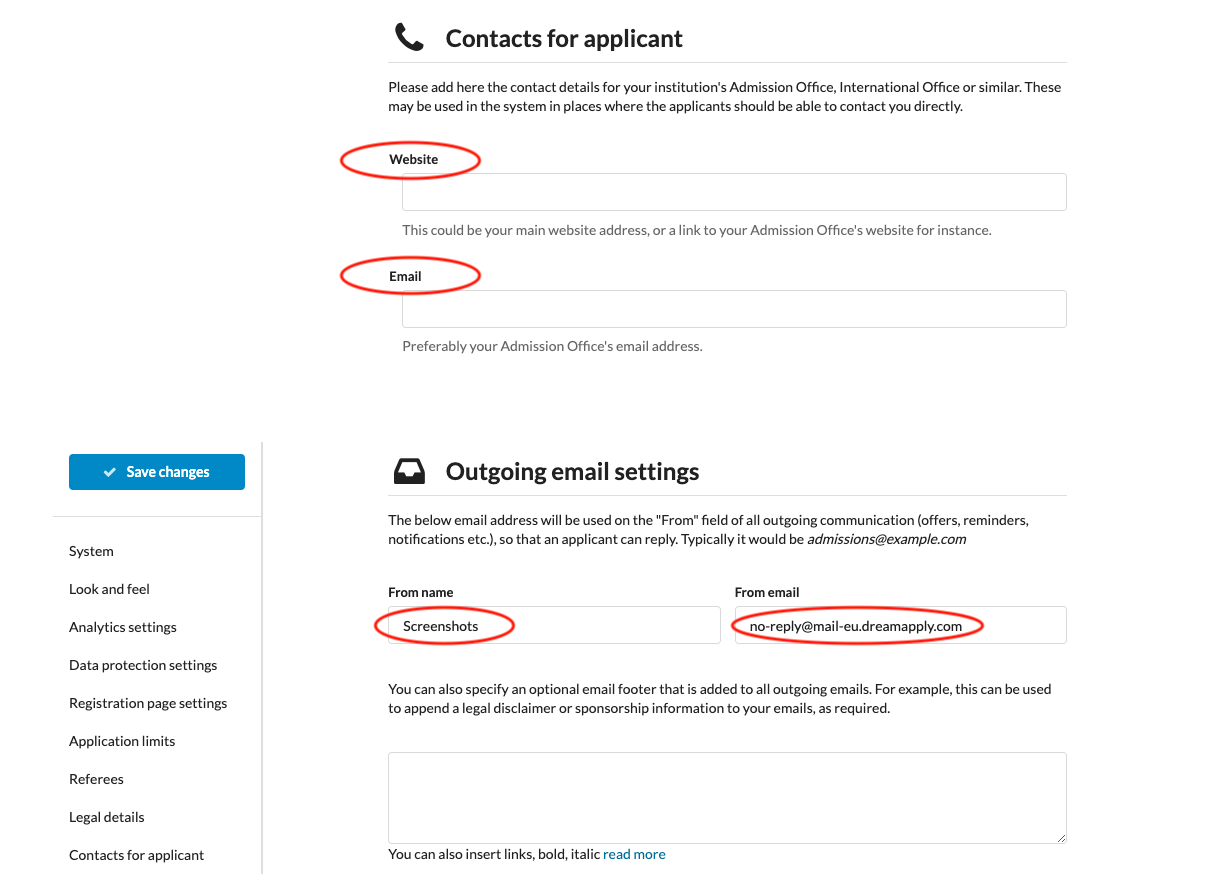
Enter Contact information - Insert the link of your university website and the email address, where applicants can contact to you.
-
Enter Outgoing email settings - Insert the “From name”, “From email”, (optional) email footer for outgoing emails from the system. This is what will be used by the system to send reminders, offers, acceptance letters, and additional information to the applicants.
-
After customising the System’s Settings, it should be one step closer to opening for applications.
How to set a main menu, calendar and news?